So, you’re sure you’re doing all the basic exercises right? Once you get something ingrained in your mind, it’s there for good. That’s especially true when it comes to the basic exercises we’ve all been doing since middle school gym class.
By now, your body might be used to the strain caused by performing basic exercises from squats to push-ups incorrectly. That back or knee pain you experience after completing your reps? It might not be from working out too hard – it could be solely because you were never taught – or paid attention to – the correct way to do some of the basic exercises. (And don’t worry – what middle schooler really pays that close of attention to teachers anyway?)
No matter what age you are, it’s never too late to go back to the basics. Lana Herzig, a New York City-based personal trainer and fitness instructor, has all the advice you need to master these basic moves once and for all.
Basic Exercise 1: Front lunge
Lunging is one of the most basic exercises and seems easy enough, but doing it incorrectly can really hurt your knees.
“When it comes to lunging, you want to make sure you’re taking a big enough step forward so that your front heel won’t come up off the floor. Also, if your step is too small, your knee will travel forward over – or past – your toes, which puts too much strain on the knee,” Herzig says.
“Instead, take a larger step forward, keep your knee over your ankle, plant your heel, and drive into the floor to return to the starting position.”
To lunge like a pro and work your quads, hamstrings, glutes, hips, core, and inner thighs, follow Herzig’s three simple steps.
How to do the perfect lunge
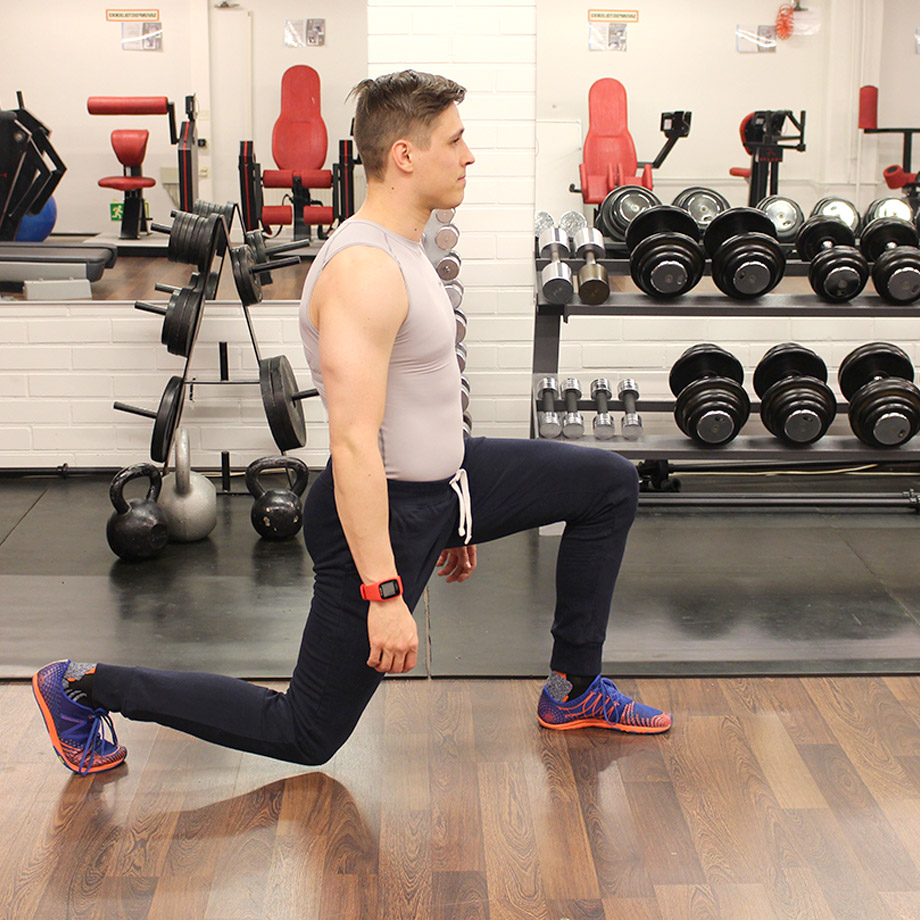
- Stand tall with your feet hip-width apart, upper body straight, shoulders back and relaxed, chest up, chin up (pick a point directly in front of you to stare at), hands on hips, and core engaged.
- Keeping that form, take a big step forward with your right leg, lowering your body under control until both knees are bent at about a 90-degree angle (back knee should be about an inch or two above the floor). Note: Make sure your front knee is directly above your front ankle and your weight is on your heels. Don’t let your knee cave in toward the center of your body.
- Powerfully push off with your right – or left – leg (driving your right heel into the ground) as you return to the starting position, all while maintaining proper posture from the first step.
Feeling confident? Perform 20 reps on each side or as many as can be performed with proper form.
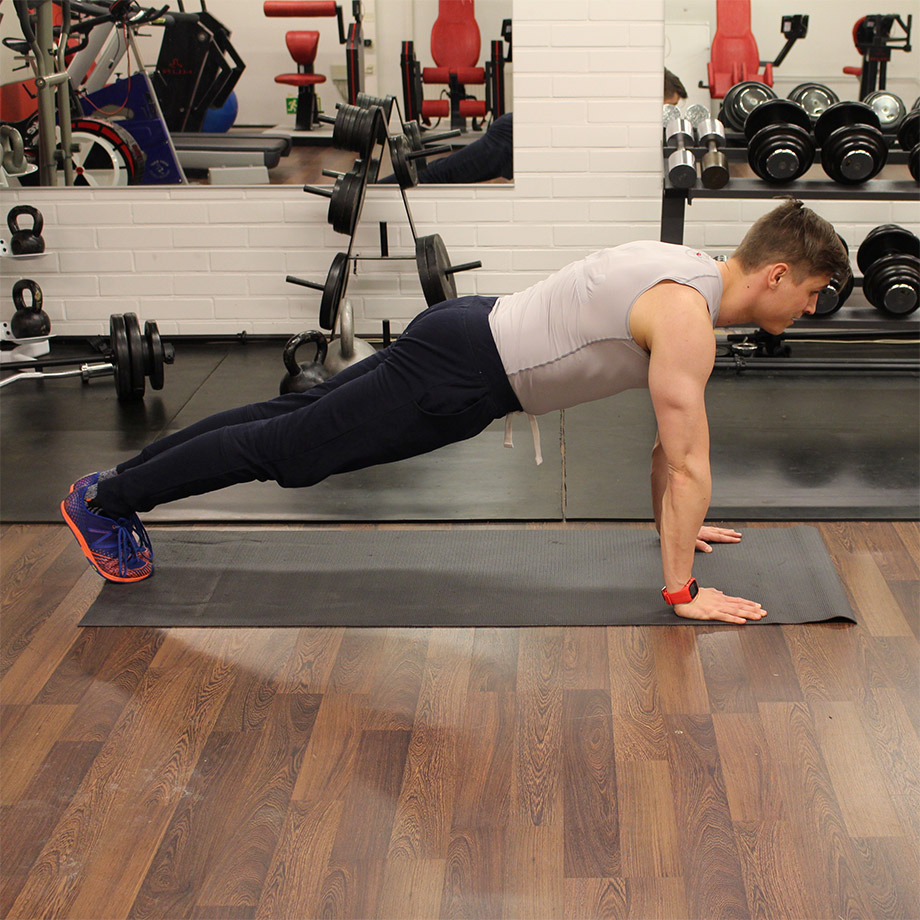
Basic Exercise 2: Plank
Oh, planks. Such a love-hate relationship. This basic exercise is the key to a strong core, but it can also really hurt your back and spine if you’re not doing it right.
“Letting your lower back and core sag toward the ground, sticking your butt up in the air, and dropping or lifting your head are incredibly common mistakes when it comes to planks,” Herzig says. “When performing a plank, it’s important to have your shoulders, hips, knees, and heels all in alignment.”
Easy enough, right? Herzig recommends imagining you have a straight, metal rod throughout your body that connects your head to your heels. And since this rod doesn’t bend, it shouldn’t have any kinks.
How to do the perfect plank

- Plant your hands directly under your shoulders (slightly wider than shoulder-width apart), as if you’re about to do a push-up.
Have a wrist injury? Place your forearms on the ground with your elbows aligned below the shoulders and arms parallel to the body at about shoulder-width distance. - Ground your toes into the floor and tighten your core and glutes to stabilize your body. Pull your belly button in toward your spine.
- Look at a spot on the floor about a foot beyond your hands to help neutralize your neck and spine and keep your head in line with your back.
Hold the position for 20–30 secs. Don’t forget to breathe!
Feeling confident? As you get more comfortable with the move, hold your plank for as long as possible without compromising form or breath.
Basic Exercise 3: Push-up
Push-ups might be one of the most commonly misperformed basic exercises. Although the majority of us have been taught to perform the muscle-boosting movement with our arms out at 90-degree angles, that’s not how the pros do it.
“I always see butts either dipped or sticking up in the air and people ‘T-ing’ their arms and straining the necks,” Herzig says. “Like when executing a plank, it’s also important to have your shoulders, hips, knees, and heels in alignment when performing a push-up.”
Ready to work your chest, triceps, biceps, deltoids, and back, all at the same time? That’s what we thought.
How to do the perfect push-up
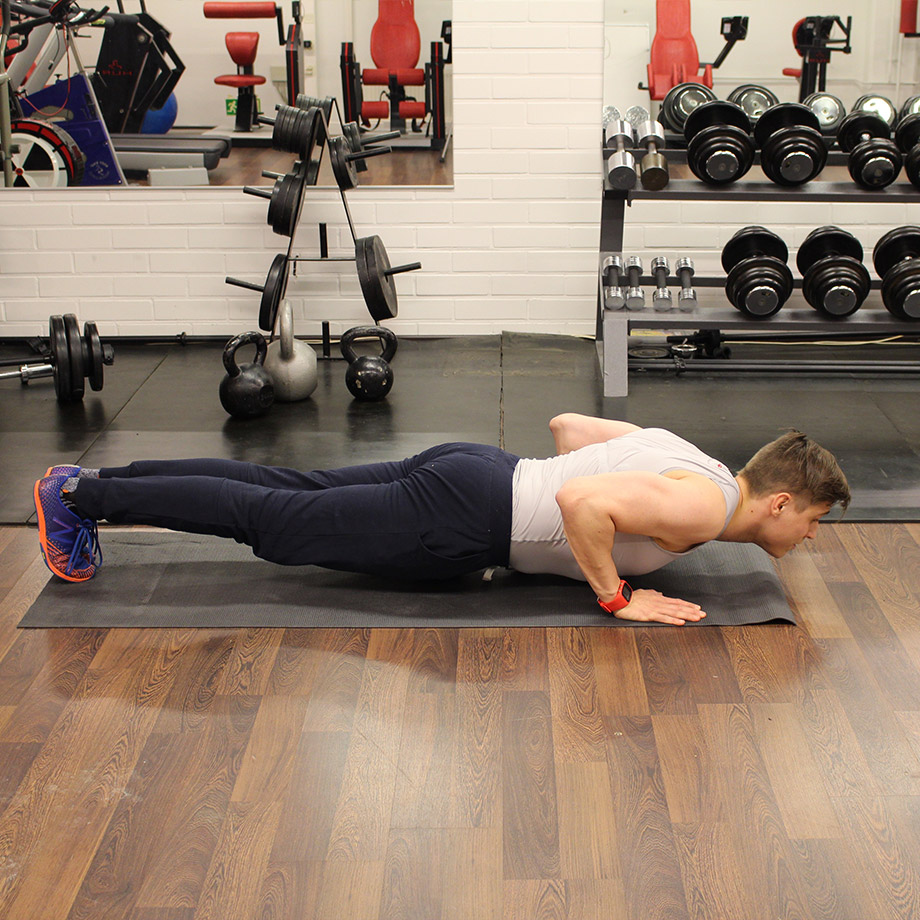
- Plant your hands directly under your shoulders (slightly wider than shoulder-width apart) as if you’re doing a plank. For those with wrist injuries, place a pair of dumbbells at the spots where you’d position your hands. Grasp the handles and keep your wrists straight as you perform the exercise.
- Ground your toes into the floor and squeeze your core and glutes to stabilize your body.
- Keeping your head, shoulders, hips, and heels in a straight line (eyes should be focused on the floor about a foot or two in front of your hands), lower your body under control until your chest nearly touches the floor. As you lower, keep your elbows closer to your body so that your upper arms form a 45-degree angle when your torso is in the bottom position of the move.
- Pause, then exhale as you push back up to the starting position as powerfully as possible without compromising form.
Feeling confident? Perform 10–20 reps or as many as can be performed with proper form.
Basic Exercise 4: Crunch
Crunches seem easy enough, but actually working your core without yanking your neck, crunching too high, or using momentum is harder than you’d think. In fact, the easiest way to do a proper crunch is to quit trying so hard. Bet you thought you’d never read those words in a fitness how-to.
“When performing crunches, a little motion goes a long way,” Herzig says. “Focus on strength versus momentum by keeping your movements slow and controlled. If you rush through the exercise, you’re cheating yourself out of the benefits and increase your risk of getting injured.”
How to do the perfect crunch
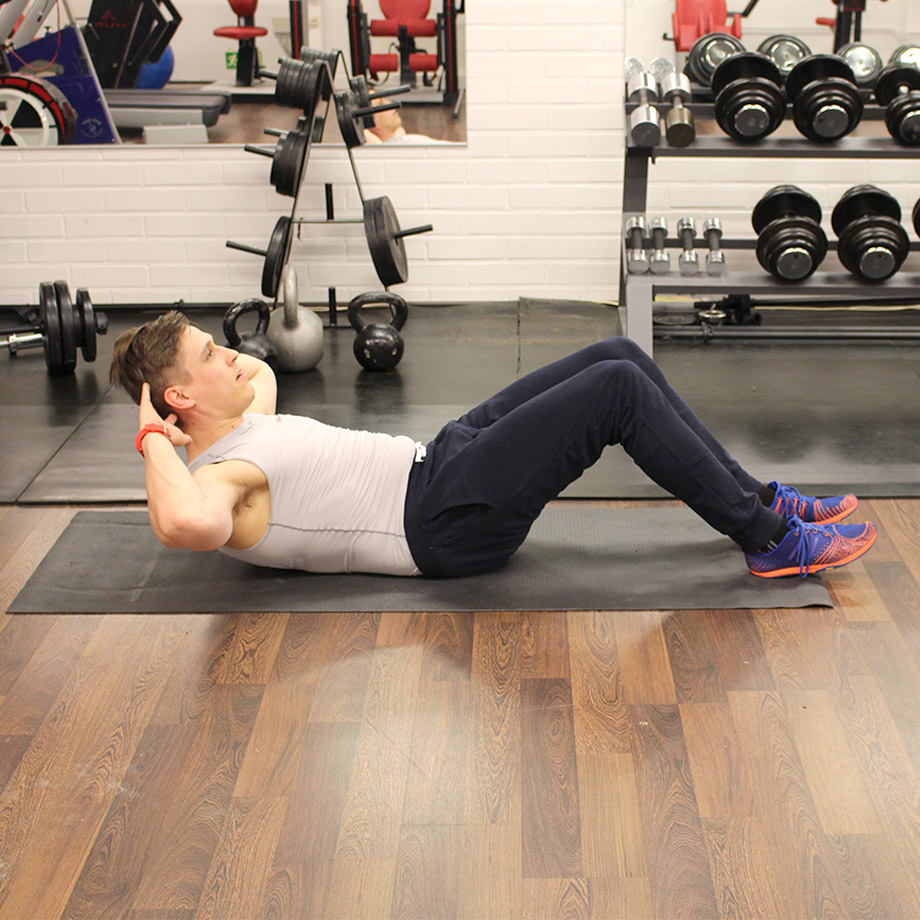
- Lie on your back with your feet flat and knees bent (hip distance apart or together depending on comfort).
- Press your lower back into the ground to avoid any overarching of your spine and place your fingertips behind your head for support with your elbows out to the side and chin slightly lifted. Note: Avoid lacing your fingertips together as it puts too much pressure on your neck.
- Exhale as you gently pull your abdominals inward (curling up and forward), raising your head, neck, and shoulder blades off of the floor. Note: Keep your head in a neutral position.
- Pause at the top and then inhale as you slowly lower back down to the starting position.
Feeling confident? Perform 10–20 reps or as many as can be performed with proper form.
Basic Exercise 5: Squat
Working your quads, hamstrings, glutes, calves, hip flexors, core, and inner thighs, squats are basic exercises and the key to long, lean legs and a toned butt. The only problem? It’s really easy to get this basic move wrong.
“Be careful not to round or arch your back as this causes unnecessary stress on the lower back and could lead to a pulled muscle or herniated disc,” Herzig says. “Also, it’s very common for knees to cave inward when squatting due to weak inner thigh muscles, which can lead to knee pain and injuries.”
Luckily, correcting these issues is incredibly easy. Keeping your chest and shoulders upright is a simple way to maintain a neutral spine throughout the movement, says Herzig. And to avoid knee injuries, turn your toes out slightly and frequently think of the cue “knees out over little toes” throughout the movement.
How to do the perfect squat
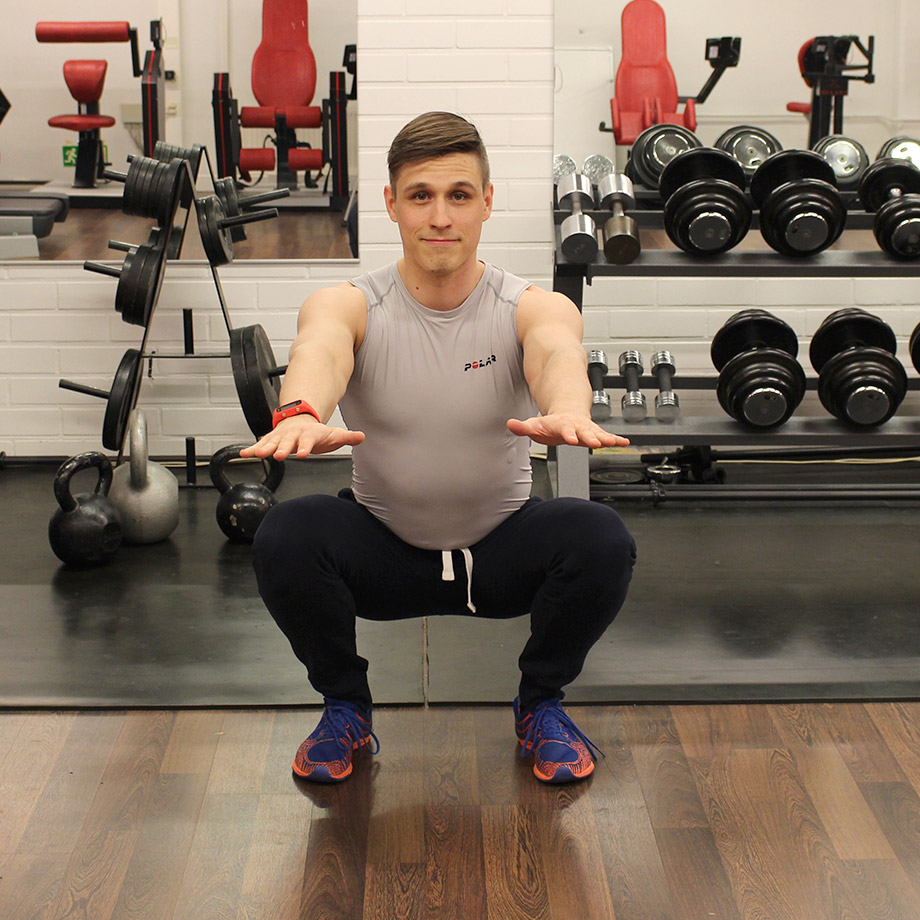
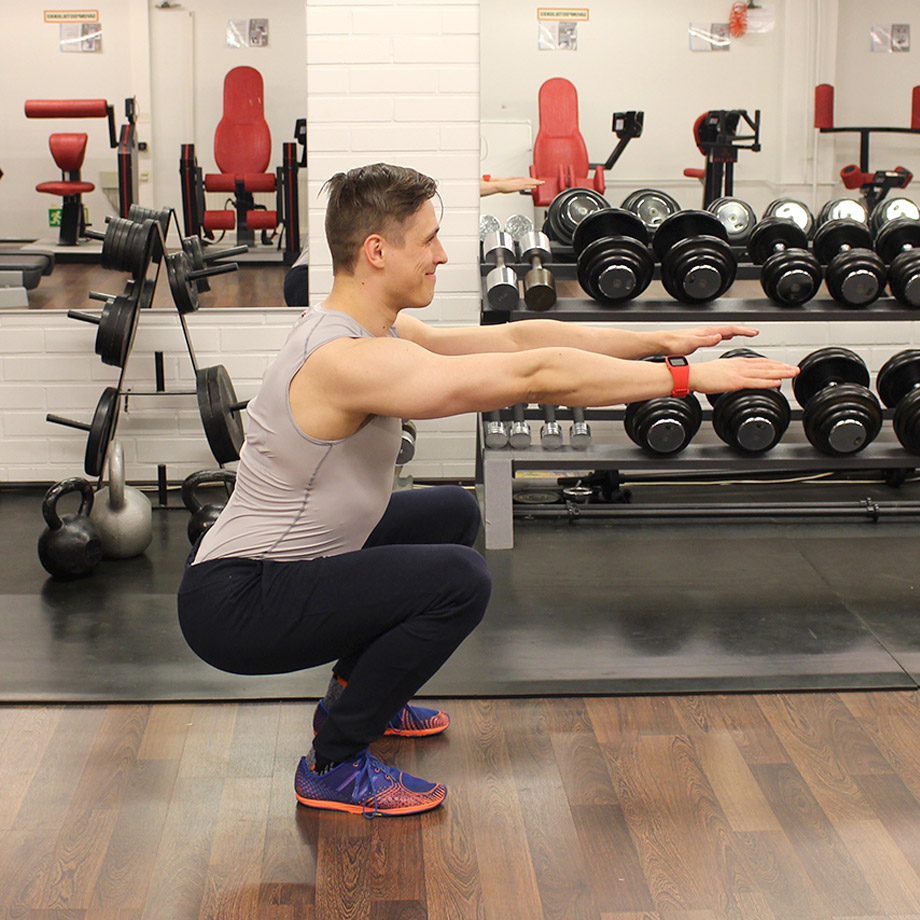
- Stand tall with your feet shoulder-width apart, toes turned out slightly, upper body straight, shoulders back and relaxed, chest up, chin up (pick a point directly in front of you to stare at), and core engaged.
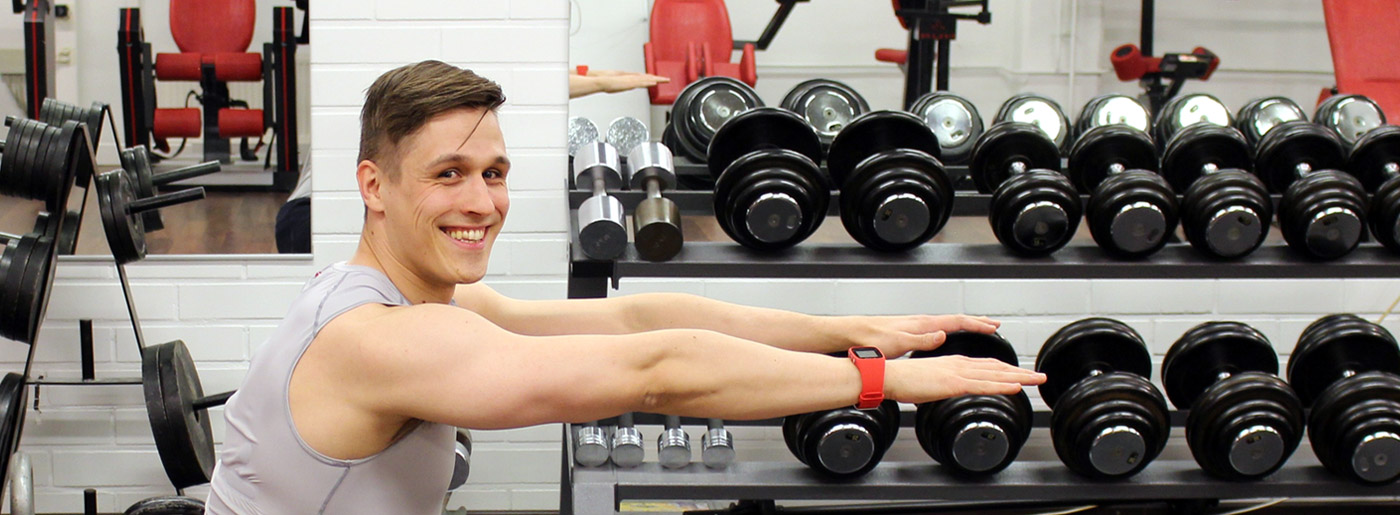
- Extend your hands straight out in front of you to help keep your balance.
- Keeping your chest up, sit back and down as if you’re sitting into a low imaginary chair, pressing your weight back onto your heels. Lower down under control until your thighs are as parallel to the floor as possible. Note: Make sure your knees are over your ankles and in line with your first and second toes. (Ideal squat depth would be the top of your hips sinking below your knees, but only if you have the flexibility to do so comfortably.)
- Engage your core and explode back up to the starting position, driving through your heels.
Feeling confident? Perform 10–20 reps or as many as can be performed with proper form.
That’s it! You’ve got all the instructions to get these basic exercises right – now it’s time to put theory into practice!
If you liked this post, don’t forget to share so that others can find it, too.
Please note that the information provided in the Polar Blog articles cannot replace individual advice from health professionals. Please consult your physician before starting a new fitness program.